14

I really love vegan ice cream, and I would love to learn how to make it myself. I know the banana trick*, but I want something richer. The ice creams I buy are coconut, cashew or rice based. I have all of those available, but no clue how to turn them into ice cream. I want:

  • a smooth texture
  • ability to incorporate a range of flavours (salted caramel and peanut butter are my favourites)
  • to avoid buying any fancy gadgets - I have a cheap blender and a freezer
  • to avoid using refined sweeteners and cane sugar if possible

*you can freeze a ripe banana, throw it in the blender and zhuzh it, and it tastes pretty creamy and amazingly like ice cream. Life is so awesome.

5 Answers 5

6

Here's an article on kosherfrugal.com that tells how to make vegan ice cream. (Full disclosure: I do have an affiliation with this website.)

Ingredients:

1 cup chick pea cooking liquid
1/8 tsp cream of tartar
1/2 cup sugar
2-3 vanilla beans

And the instructions:

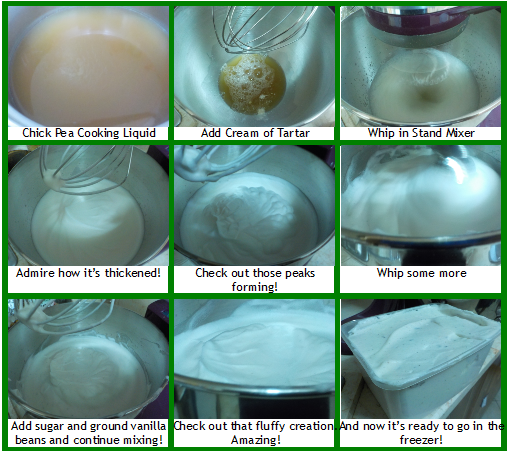
First, I put the chick pea liquid and cream of tartar in my mixing bowl, and set it to whip for a good 10-15 minutes.

In the meantime I put the sugar and vanilla beans into my coffee grinder and ground them up well.

Once the chick pea liquid had magically transformed, I added the sugar-vanilla bean mixture and whipped it some more. When it was all incorporated and seemed like it was as stiff as it was going to get, I scooped it out into a container, covered it, and dug out a spot for it in the freezer!

*Note: If you are using the cooking liquid from home-cooked chick peas, you will need to remove all the chick peas from the pot, bring the liquid back to a boil, and then simmer for about 1/2 an hour. You will see it "reduce" in volume by about 1/3. It should be about the right consistency at that point. Apparently, the liquid from canned chick peas is often already the right consistency. Done!

I have tasted this, personally - it tastes very much like ice cream, and it even feels like ice cream!

If you don't have a coffee grinder, you can grind them some other way, to, I think - with a mortar and pestle, if need be :P

0
5

A second, "no machine" answer with the lowest chance of crystals: You have to do the oldfashioned process, which was used before people automated it.

First, you need the freezing container. Take two steel bowls that fit into each other, with 2 cm or more gap. Find some way to fix them so the small one is within the large one, but hovering above the bottom and centered, to have a consistent gap everywhere. Fill with water (not to the rim) and freeze for 24 hours. If your contraption to hold both is strong enough, the expanding ice will be pushed up and will not cause problems. If it pushes the inner bowl up or something else, try salted water or vodka instead, to work with a liquid coolant.

Now that you have your frozen container, pour your chilled base into the inner bowl. Take a baking spatula. It can be silicone, rubber, or stiff (plastic/wood), the important part is for it to mostly fit the bowl's curvature. So only use a straight-sided spatula for a cylindrical or conical bowl. Start stirring with a slow, constant, scraping motion. The base that touches the wall will form a thin frozen layer, and it is your job to remove it from there and let it mix into the middle, while new liquid goes on to the wall.

Stop stirring when ready, and fill into the final container. I like using a prefrozen glass box with a snap-on plastic lid. Place it into the freezer.

The hardest part is to know when to stop. If you stop too soon, the base will still be too liquid, and it will freeze too solid afterwards. If you continue for too long, you will "butter it out" (destroy the emulsion in the base). You have to learn when a given recipe is at its best through trial and error, and stop there. As an orientation value, a standard dairy recipe with about 800 ml base takes 45 min to 60 min of stirring.

As a beginner, I will suggest using recipes with sufficient amounts of emulsifier. Creating a good vegan recipe is difficult anyway, since dairy cream and yolks are uniquely suited for good ice cream. Find a recipe which uses emulsifier and sufficient amounts of fat. To be on the safe side, consider starting with boozy styles, like this grapefruit campari sorbet (you can easily replace the cane sugar with another sugar, for example agave syrup).
3
  • Two suitable matching steel bowls, unless mail ordered, might be as expensive as a simple electric churn on sale... Commented May 31, 2017 at 18:34
  • devil's advocate question: How much could you reduce water content while still getting ice cream? Commented May 31, 2017 at 18:36
  • @rackandboneman the OP doesn't say anything about economic factors, just asks about no-machine approaches. As for the "devil's adv." question, I have addressed it before: "McGee gives the ratio for good ice creams at 15% sugar, 10 to 20% fat (says that 17% fat are required for smooth freezing in a home ice cream maker), and 60% water. I suppose that the missing ingredients (to sum these figures to 100%) are solids which are neither fat nor sugar, regular ice cream gets them from the egg, dairy and fruit (or other taste carrying ingredients)." cooking.stackexchange.com/questions/18566
    – rumtscho
    Commented May 31, 2017 at 18:41
3

I know you said you don't want it "expensive" or "fancy", but I must say that your requirements are in direct contradiction with each other. Specifically, the "no crystals" part is actually a continuum - all of the machine-free methods produce some amount of crystals, and when buying a machine, you need a complex, well-engineered one to get a low amount of crystals. The lower you get in price, the more likely that your ice cream will have some crystalization. So it is up to you to know which point on the tradeoff line between costs (money, noise, space) and crystals is the best for you.

Most home cooks opt for a frozen bowl style machine. Mine is from Krups, price currently 55 Euro. When used properly (it really needs the 24 hours prefreezing required in the manual, even if it feels cold enough after a few hours) it turns good recipes into pleasantly smooth ice cream. I must admit that my only attempt at vegan ice cream turned out very badly, but I suspect that this was the recipe's fault. I think that within the cheap class of frozen bowl makers, you still have to buy a higher priced one like mine, since the lower priced ones tend to have negative reviews and test results.

A thing to pay attention to if you are going for a frozen bowl one: in the USA, a very popular option is the Kitchen Aid attachment. Its paddle turns much quicker than that of a machine with its own motor, creating much more overrun. It is up to you to know if this is what you like, or if you want a slow turning one.

Basically all other methods I know of require a blender with oomph to get anything smooth, because there you first freeze your base solid and then blend it, and a normal blender can't deal with that. You can go the low-tech way to create a granita, but not a sorbet or a vegan icecream.

The "freeze whipped cream" method is good for dairy ice creams, so the aquafaba substitute from the other answer is worth a try. My feeling is that it won't allow for the incorporation of much fruit, and of course it has high overrun, but if this is what you like, go for it. Peanut butter should be easy enough to add, and will even decrease overrun.

You don't have to worry about cane sugar, icecream is actually easier to make with high fructose sweeteners (and ends up with less crystals). So just use one of those.

2
  • I don't want to buy a machine at all if possible
    – Zanna
    Commented May 7, 2017 at 15:03
  • That's why I wrote the first paragraph - if you don't buy a machine, you will have to live with crystals.
    – rumtscho
    Commented May 7, 2017 at 15:49
1

I have successfully tested two-and-a-half simple methods for vegan ice cream.

"Healthy" high-effort tofu banana ice cream

This recipe can be made with different flavourings, but chocolate is a good choice with banana imho. You need to stir the ice cream 3 times every 2 hours, which means you should make it on a day when you don't need to leave the house...

Makes 2-4 portions

  • 2 large, very ripe bananas
  • 200g silken tofu
  • 2-3 tbsp cocoa powder, carob, or whatever you like
  • 1/2 tsp vanilla seeds or 1 tsp good quality vanilla extract
  • 3-4 tbsp cashew butter or ~1/2 cup cashews ground to a fine powder
  • 1-2 tbsp rice syrup or maple syrup (or any liquid sweetener or sugar)
  1. Blend the ingredients until smooth
  2. Transfer to a container and place in the freezer for 2 hours
  3. Remove from freezer, stir to break up the crystals, return to freezer for 2 hours
  4. Repeat step 3 twice more.

High-fat low-effort coconut milk kind-of ice cream

This method comes from my favourite cookbook, Vegan Richa's Indian Kitchen. It's a vegan version of kulfi, which is maybe not exactly ice cream as it's denser. However, it's totally amazing.

Makes 6 small portions

  • 1/3 cup ground raw cashews
  • 1 tbsp cornstarch or arrowroot
  • 400ml full fat coconut milk*
  • 3 tbsp water
  • 1/2 tsp saffron strands (optional - add rose water instead if you like)
  • 1/3 cup ground raw sugar
  • seeds from 1 cardamom pod, ground finely
  • pinch salt
  • chopped nuts and/or dried fruit if liked
  1. Soak the saffron in the water for 5 minutes
  2. Meanwhile, mix the cashews and starch with 1/2 cup coconut milk until smooth
  3. Heat the water, saffron and sugar until the mixture boils (4-5 min)
  4. Add the cashew coconut mixture with cardamom and salt, and bring back to the boil (5-7 min) then remove from the heat
  5. Stir in the remaining coconut milk very well, and add any additional ingredients
  6. Pour into lolly moulds or serving glasses/bowls and put in the freezer for at least 8 hours
  7. Allow to stand at room temperature or in the fridge for 15 minutes or so before serving, for a softer texture

* This recipe works (no crystals) because of the high fat content, so it probably won't work well with "light" coconut milk (which just has more water added). You want one that is 50% coconut.

1

I used to make a lot of ice cream using frozen bananas as the base. To add more flavor, you'll need to experiment or find a recipe online. Personally, I achieved many different flavors, including the ones you mentioned in your question (like by adding peanut butter).

Here’s my method:

  1. Peel the bananas and break them into smaller pieces. I prefer breaking them by hand, as using a knife can make them a bit juicy. Just try to pull a medium-ripe banana apart into 4-5 pieces.

  2. Put the banana pieces in a container with a lid (either glass or plastic) and freeze them for a couple of hours.

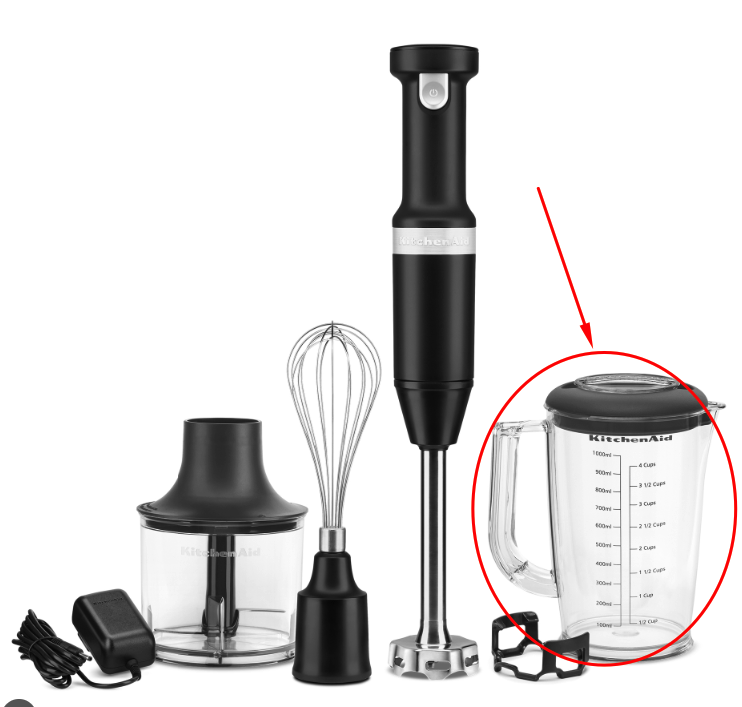
  3. Place the frozen pieces in a small bowl or a measuring cup that works with a hand blender or immersion blender.

See the photo for an example:

hand blender kitchenaid accessories

  1. Blend the banana pieces with the hand blender.

If the ice cream is too thick, you can add a few drops of plant-based milk or coconut milk, but it might not be necessary. You’ll need to try this a few times and play around with the "temperature" of the bananas for the best results. Once you get the hang of it, it becomes easy.

You can also add other ingredients. For example, I sometimes add frozen berries, peanut butter, or cocoa powder.

I don’t think this requires any fancy equipment. I got a KitchenAid hand blender for under $100 when it was on sale, and I use it for many other things, not just ice cream. I'm sure this can be done with a cheaper hand blender, but a higher-quality one is recommended.

For me, the texture is great—it’s creamy and not watery at all. If you want to make it less thick, you can always add some liquid like oat milk. There’s no need to freeze or refreeze anything else, as the frozen bananas will chill any other ingredients you add (as long as you don’t add too much).

TL;DR: With proper planning, making ice cream can be easy and take only a few minutes without needing any fancy equipment. A hand blender alone does the job.

Your Answer

By clicking “Post Your Answer”, you agree to our terms of service and acknowledge you have read our privacy policy.

Not the answer you're looking for? Browse other questions tagged or ask your own question.